Showing posts with label programming. Show all posts

Wednesday, June 13, 2012

JsonMappingException when serializing POJO reverse engineered using Hibernate, to JSON

We were working recently on a Java project with Hibernate as the ORM. We created the database and reverse engineered the entities to POJO using Hibernate (See how).

I am putting up a simple ER diagram to demonstrate the issue.

Each Item has a list of item details which are name/value pairs.


And we needed to serialize this object to JSON so we used Jackson. And when trying serialize we were confronted with an exception.

org.hibernate.LazyInitializationException: failed to lazily initialize a collection of role: ItemDetail.item, no session or session was closed

Closely looking at the generated ItemDetail class I found that there was a Item defined there. 

   @ManyToOne(cascade={}, fetch=FetchType.LAZY)  
   @JoinColumn(name="item_id", unique=false, nullable=false, insertable=true, updatable=true)  
   public Item getItem() {  
     return this.item;  
   }  
   public void setItem(Item item) {  
     this.item = item;  
   }  

The first (stupid) thing I tried was to change to FetchType from LAZY to EAGER. which I thought would solve the problem.  However that resulted in a StackoverflowException because the serializer kept recursing and it would never reach the end.

 Exception in thread "main" org.codehaus.jackson.map.JsonMappingException: Infinite recursion (StackOverflowError) (through reference chain: ItemDetail["item"])

The problem here is that Hibernate provides us a way to navigate back using the foreign key relationship where in this instance to get the parent Item that belongs to each ItemDetail. But Jackson did not like it!

The solution was VERY simple.

Simply inform the serializer to ignore such parent relationships. You can inform Jackson to leave it aside using @JsonIgnore (See all the annotations here).

   @ManyToOne(cascade={}, fetch=FetchType.LAZY)   
   @JoinColumn(name="item_id", unique=false, nullable=false, insertable=true, updatable=true)   
   @JsonIgnore  
   public Item getItem() {   
    return this.item;   
   }   

And Jackson did not try to serialize it and it worked just as expected!

Sunday, July 12, 2009

Dynamic searching/filtering of DataGridView, ListBox

Have you seen those nifty tricks where a data grid view or listbox is filtered as you type in a text box? Believe it or not its really really easy using both Visual Basic and C#. I thought it was hard too… that i have to run through nested for loops… but Visual Studio it self has done the hardest part and made it easy for us!

Difficulty : Easy

Time required : Less than 5 minutes

Prerequisites : Connecting to a database, Filling in a DataSet/DataTable


Ok lets get it started, lets first do it in Visual Basic

image

All you need is a data grid view and a text box! Its simple as that! Now lets load the data! Make sure you have created an SQL Server database, and filled it with data!

OK lets fill the data grid view with the data!


Imports System.Data.SqlClient

Public Class Form1


Dim ds As New DataSet


    Private Sub Form1_Load(ByVal sender As System.Object, ByVal e As System.EventArgs) Handles MyBase.Load

        Dim con As SqlConnection = New SqlConnection("Data Source=.\SQLEXPRESS;Integrated Security=true; Initial Catalog=Bodgett")
        con.Open() 

         
        Dim da As SqlDataAdapter = New SqlDataAdapter("SELECT * FROM Employee", con)

        da.Fill(ds, "Emp")


        DataGridView1.DataSource = ds.Tables("Emp")

    End Sub


End Class

Ok…now run the project and you will be (you should! ) see the data grid view filled with the data! Like this…

image

Assuming that everyone went as planned, lets do the actual filtering!

Before actually coding, here is a heads up on the syntax used for the filtering.

Lets say we want to find the employee with the first name ‘Lilak’

Then the row filter would be Emp_FName = 'Lilak'

Or lets say that we want to find some one with the email address equals to ‘emiley@bodgett.com’

then the row filter would be Emp_Email = 'emiley@bodgett.com'

But how do we search for both at the same time, simple combine them with a “and”

eg: Emp_FName = ‘Lilak’ AND Emp_Email = 'lilak@bodgett.com'

But as you can see, there is no use of filtering without the use of WILD CARDS! (I love ‘em!)

The wild cards that can be used in a Data Grid View are % and *, which does the same job!

Now lets say we want to filter records based on the email provider.

Its going to be like Emp_Email LIKE '%yahoo%'

the % sign represents 0 or more characters.

So now hoping that you guys know how to write the filtering syntax, lets get wet with the actual coding… well, there is no CODING that you to do, as it is something that could be done with…yes my friends, 1 LINE OF CODE :)

ds.Tables("Emp").DefaultView.RowFilter


ds is our DataSet, but we are actually applying the coding to a DataTable’s (which is “Emp”) DataView. We are changing the RowFilter property of the DataView.


ds.Tables("Emp").DefaultView.RowFilter = "Emp_FName LIKE '*" & TextBox1.Text & "*'"


This changes the RowFilter while text is being typed on to the textbox, which dynamically filters the records according to the text. Notice that i have used * but remember % can be used too. For an example if the user enters the word Jason to the textbox, the rowFilter would look like


Emp_FName LIKE '*Jason*'


including the quotes ' '


Now run the program and see how it is…


So how do you filter based on multiple attributes. Easy! Just separate the multiple attributes with a OR


So if we want to filter using both First name and Last name we would use something like


ds.Tables("Emp").DefaultView.RowFilter = "Emp_FName LIKE '*" & TextBox1.Text & "*' OR Emp_Lname LIKE '*" & TextBox1.Text & "*'"


For the input “Jason” for the textbox this would output something like


Emp_FName LIKE '*Jason*' OR Emp_LName LIKE '*Jason*'


So this is it folks, the coding is over and so is the tutorial :)


For more information on rowFilter and rowFilter expression read these articles on MSDN


http://msdn.microsoft.com/en-us/library/system.data.dataview.rowfilter.aspx


http://msdn.microsoft.com/en-us/library/system.data.datacolumn.expression.aspx


Here is the complete coding for whoever wants it :D


Imports System.Data.SqlClient

Public Class Form1


Dim ds As New DataSet


Private Sub Form1_Load(ByVal sender As System.Object, ByVal e As System.EventArgs) Handles MyBase.Load

Dim con As SqlConnection = New SqlConnection("Data Source=.\SQLEXPRESS;Integrated Security=true; Initial Catalog=yourDBName")
con.Open()


Dim da As SqlDataAdapter = New SqlDataAdapter("SELECT * FROM Employee", con)

da.Fill(ds, "Emp")


DataGridView1.DataSource = ds.Tables("Emp")

End Sub


Private Sub
TextBox1_TextChanged(ByVal sender As System.Object, ByVal e As System.EventArgs) Handles TextBox1.TextChanged
ds.Tables("Emp").DefaultView.RowFilter = "Emp_FName LIKE '*" & TextBox1.Text & "*' OR Emp_Lname LIKE '*" & TextBox1.Text & "*'"

End Sub
End Class


Blogger Labels: Dynamic,DataGridView,ListBox,tricks,data,grid,text,Visual,Basic,Studio,self,Easy,Time,Prerequisites,database,DataSet,DataTable,Server,System,SqlClient,Public,Class,Private,sender,Object,EventArgs,MyBase,Load,SqlConnection,Source,Initial,Catalog,Bodgett,Open,SqlDataAdapter,SELECT,FROM,Employee,Fill,DataSource,syntax,WILD,CARDS,View,records,provider,characters,DefaultView,RowFilter,DataView

Thursday, March 12, 2009

How to connect to a SQL Server database using Visual Studio

Hoping that the credit screen is working properly, lets move on to the basics of connecting to a database and retrieving single or multiple data items. For this tutorial we are using Visual Studio 2008 with Microsoft SQL Server (which is normally installed with Visual Studio)

So fire up the IDE (Integrated Development Environment) which is Yes! You guessed it right! Visual Basic Studio and lets get down to some serious business.... (Well its easy! Believe me! )

So once the IDE is up and running start fresh with a new project. Make it a Visual Basic Windows Application.

Now lets first add a database to this project.

Go to Project -> Add New Item

Now you will be presented with a huge list of items that can be added to the Project. And as you may have seen, there are 2 types of databases. Local Database which has a file name like Database1.sdf and Service Based Database which has a name like Database1.sdf. So what is the difference? Well i was very curious about it and did some simple googling and found out that


Local Database
A Local Database which has the file extension .sdf is a type of database that is usually used in Mobile Applications. Its a kind of a database which is normally handles database tasks in your PDA or your favourite .
Remember, that though they are intended for Mobile devices, they can be used in desktop standalone applications as well. In contrast to a Service Based Database, as the name implies it does not require a service to be running in the host computer to access the data. The main disadvantage of this is the lack of support for multiple concurrent users. Enough said! Lets move on to Service Based. Well, a lil bit of googling wont hurt you!


Service Based Database
Service Based Databases, again, as the name implies requires a service (Microsoft SQL Server) to be running in the host computer to access the data. These databases ends with the extension .mdf and can be used in large scale applications with zillions of data. These kind of servers coupled with a high end server machine can handle A LOT of concurrent users. Also remember that these databases can also be used in a normal database applications as well. These databases can act as a back end for data intensive websites as well. Another very popular similar database is MySQL.


Now for this tutorial we will use a Service Based Database. Don't worry! I will cover the Local Databases as well. Though they are different conceptually, the coding is not much of a difference.

So now select the Service Based Database from the list of items available. If you find it hard to find it (i dont think so :D) select the category "Data" from the left panel to narrow down your search.


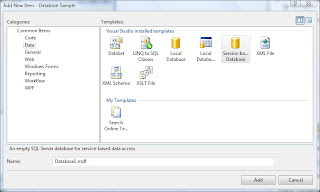
Finally, press Add to add the database to the project. If you are getting a problem at this time, you must have either not installed SQL Server or SQL Server is not running. That being the most basic reasons for the errors, please Google if otherwise.

In the next screen press "FINISH"

You will see that the Database1.mdf is added to the Server Explorer and is displayed in the Solution Explorer.

If you are familiar with creating Tables. Go ahead and skip this section or else keep reading...

Creating a Table
Now lets create a table in the database which we can add/retrieve data. For that simply expand the Database1.mdf using the + button in the solution explorer. After that Right Click on the Tables (In the folder like list of icons) and select Add New Table.


Now you will be presented with a screen which will allow you to define the structure of the table you will be creating. For now, we will create a simple table but i will emphasize on important features with this simple table.

Lets imagine, you have being called by your employer to create an application to keep in track of all the employee's names, their telephone numbers, their addresses and their current status. So for this, you will need 4 fields with different data types.

Read this for further information on choosing data types

So lets create the Table. But there's a catch! Actually you will require 5 fields! The extra one being for the Primary Key. I cannot dig in to deep about creation about databases here because i would need to write a book about it :D But simply put, a Primary Key is something that would identify each record of the database uniquely. For an example we can make a social security number or national identity card number as a PK (Primary Key) because they will never ever ever be duplicated! Please read these articles i found if you do not understand yet, what PK means. Please read THIS, THIS and THIS

So now lets move on and create the fields. Now we have to insert a special field! The PK! So lets choose something like empID which means Employee ID. The data type depends on how many employees are going to be working in the company. Lets say its a very small company with only around 50 people are working, you can select "tiny int". The data range for Tiny Int is 0-255. Always choose a data type which will support extra for future expansion. If the company has more than 1000 employee's the go for Small Int which supports up to -32,768 to 32,767. Forget about the -minus! But now you can store up to 32000+ employee records. For this example, i will choose Small Int. Now right click on the empID field and click "Set Primary Key"


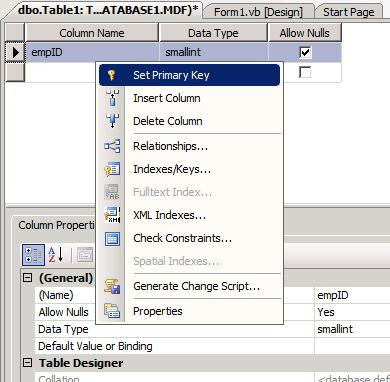
As soon as you make it a primary key notice that "Allow Nulls" checkbox gets unchecked. Because a primary can never ever ever be null (or duplicated!"). Now lets make the primary key get automatically incremented on each record. So when you insert the first employee record, it will get the employee id 1 and the next employee 2 and so on. To do this, scroll down in Column Properties just below where you are creating the table while empID is selected and expand (+) Identity Specification. Now make the "Is Identity" Property True. Now you can specify for "Identity Increment" the amount that should be incremented on each record and "Identity Seed" to specify on where to start incrementing. Lets keep it on the default.

When selecting data types to hold text there is char,varchar,nchar,nvarchar.
the difference between char and varchar is that char is a fixed length text. So if you specify a text shorter than the fixed length, it will add additional spaces to make it to length. In contrast, varchar while having a maximum character limit does not do anything if the input text is smaller than the length.

Use char for text with a fixed length such as a telephone number/identification numbers.
Use nvarchar for anything that the length is unsure such as names, addresses, email addresses etc.

The "n" in front denotes that the field can hold non-unicode characters.

Now lets quickly fill the rest of the table.

Finish the table according to the picture below.

image
Now Save the Table! Use the Save button on the toolbar and enter the name “Employee”. Try to avoid spaces in the name which will later be a trouble when writing SQL statements.
Now that you have created the data, lets fill it with some data… :)
Show Table Data
Right Click the Table and Select “Show Table Data”. Now you can add data in to the table.
image

Fill the table with appropriate data. Don’t worry about inserting an empID, just finish empName and other columns and move on to the next. Filling the empID is automatically handled.
Now that you have Database and a table with data, lets see how you can connect and retrieve the data! :D
image
First add a DataGridView to the form. A DataGridView is a table like view which will allow to show data in a convenient manner.
Now that the DataGridView is added, add a button too and change the name to “cmdLoad” and Text to “Load”
Now your form should look like this.
image
Now my favorite part! Coding!!!!!!
Double Click the Load button and lets start CODING!
First you have to create a Sql Connection to the Database. It is achieved by a SqlConnection object and its connection String.
Dim con As New SqlClient.SqlConnection


Now we have to set the con’s connection string property. The easiest way to get a connection string is from http://www.connectionstrings.com/


But for SQL Server the connection string is pretty straight forward.


Because we are using SQL Server Express Edition (Default SQL Server edition installed with VS 2008) the connection string is the following


con.ConnectionString = "Data Source=.\SQLExpress;Integrated Security=true; AttachDbFilename=|DataDirectory|\Database1.mdf;User Instance=true;"


Now when the connection string is added the next thing you should do is you should open the connection.


con.Open()


Now lets fill the DataGridView with the data in the Table.


First you should understand that the database only understands SQL. So we should construct an SQL statement to talk with the database. SQL stands for Structured Query Language. If you like to learn more about SQL syntax please refer to w3schools and w3schools SQL Select Statement.


Dim sqlString As String = "SELECT * FROM Employee"


This is simply a string which contains the command we are going to pass to the database. This simply says SELECT ALL RECORDS FROM THE TABLE Employee.


Now we require a middle man which will do the talking to the database. Ladies and Gentlemen, say Hello to the SQLDataAdapter. This nice friend when told what to get from the database, will talk in a nice way to the database and get the job done. 


Dim da As New SqlClient.SqlDataAdapter(sqlString, con)


Our “da” is the SqlDataAdapter and we tell him to use sqlString that we wrote and the connection. It is like telling someone what to buy and where to buy :)


Now the “da”, our SqlDataAdapter knows what to buy and where to buy but where to put all the grocery ??


That is where a DataSet comes to play! A DataSet is a object similar to a Shopping Cart :D You can hold one or more tables inside the DataSet. 


Dim ds As New DataSet


OK! Now we’ve got everything! Lets go shopping!


da.Fill(ds, "EmployeeTable")


What the above code does is calls the Fill method of the Data Adapter where two parameters are passed. We are telling the data adapter to use the SQL Statement and the connection we gave and fill the DataSet ds with the data returned from the database and name that set of data “EmployeeTable”


If you did not understand what was told above, take the Shopping Cart for an example. 


image 


A DataSet can keep hold of different sets of tables and data. But when we want a particular set of data how do we retrieve them? That is why each set of data is given a name. Daddy could be a table in the Database, so is Mommy, John and Dan. 


Shopping is over folks! If you did not encounter any problems you have successfully filled the Dataset with all the information in the Employee Table. (Remember? “SELECT * FROM Employee”? SELECT ALL)


So now we should tell to the DataGridView to load the data from the DataSet.


DataGridView1.DataSource = ds.Tables("EmployeeTable")


DataSource is a property of the DataGridView which tells where to get the data. We are telling to get the data from the object ds’s (the dataset). Notice that ds contains “Tables”, which are like compartments storing data. So we are asking for the container named “EmployeeTable” which we filled prior. If you know about arrays, you can use the array index instead of the name of the container. The following code will work too, because it is the first container of data we filled.


DataGridView1.DataSource = ds.Tables(0)


Notice that we have included an array index (aka array subscript) 0. Why 0?? Why not 1??? Because in VB .NET, an array always starts with the index 0. 


OK now after the coding is done. Run the program and press the “Load” button. Your DataGridView should be filled now!


image
Here is the complete coding!


Public Class Form1

Private Sub cmdLoad_Click(ByVal sender As System.Object, ByVal e As System.EventArgs) Handles cmdLoad.Click

Dim con As New SqlClient.SqlConnection
con.ConnectionString = "Data Source=.\SQLExpress;Integrated Security=true; AttachDbFilename=|DataDirectory|\Database1.mdf;User Instance=true;"
con.Open()

Dim sqlString As String = "SELECT * FROM Employee"
Dim da As New SqlClient.SqlDataAdapter(sqlString, con)

Dim ds As New DataSet


da.Fill(ds, "EmployeeTable")

DataGridView1.DataSource = ds.Tables("EmployeeTable")

End Sub
End Class


Saturday, February 21, 2009

Create a sliding credit screen in VB .NET

Difficulty : Very Easy


Time to Complete : 10-15 minutes


Click the images for larger images!


Most of you must be familiar with the sliding credits screen in many different software. When you click the about box in the software, you are presented with a sliding text moving upwards with nice music. So lets see how to do it with Visual Basic .NET 2008


Start either Visual Studio 2008 or Visual Basic Express 2008. This works in Visual Studio 2005 and Visual Basic Express 2005 as well.


Go to File –> New Project and select “Windows Forms Application” under Visual Basic –> Windows. (See the pane to your left). Rename it below to Credit Screen or what you think is appropriate.


Step 1


ScreenHunter_06 Feb. 21 11.51


Now lets fit in the components :)


Ingredients


1 Label with whatever text you want do display


2 Timers


Few lines of coding


Lets start cooking!


First drag and drop 2 Timers to the screen. Timers are found in the Toolbox which is to your left of screen (usually!) under Components.


Timer is a component which will repeatedly execute a command or set commands at an interval specified. You can use a Timer to change something every 1 second or every 10 seconds. So we are using a Timer now to change the background color! Neat, eh? :)


ScreenHunter_09 Feb. 21 12.05


Notice that now you have 2 Timers in the bottom pane of the screen.


So Timer1 is going to be take care of the colors! Oh yes colors! I’m pretty sure you don’t want the text to slide up in some empty boring background. So we will be making the screen display random colors while our text is sliding up.


Now lets change the properties of “Timer1”. Properties are displayed in a small box usually to the bottom right of the screen. Properties are different attributes of components which is used to change how the components look and behave.


Now change the properties of Timer1.


  • Enabled –> True


  • Interval –> 100


By setting the Enabled property to True we are telling the computer that the Timer will be acting and executing its commands at run time. The interval is how often the commands should be executed.


Now that the properties are changed, lets code for the Timer. Double click the Timer1. You will be presented with the coding window which will look something like below.


ScreenHunter_11 Feb. 21 12.29


Private Sub Timer1_Tick(ByVal sender As System.Object, ByVal e As System.EventArgs) Handles Timer1.Tick
'Whatever your coding
End Sub


The coding between the above 2 lines are the lines which will be executed at the specified interval, in our case each 100 milliseconds the ‘Whatever your coding line will be executed. But as a ' is at the beginning of a line which means the line is comment, it will not execute the line.


Now what we are actually going to to is create random colors at each interval of the timer and assign them as the background color at the same time. So we need variables to hold the colors. Probably you must be knowing that almost all the colors in this world can be created with the primary colors RGB. Red. Green. Blue. If you do not understand it now, dont worry! You will later!


OK…now we know what the Timer does lets get to the real coding! yippee!


'We create 3 Integer Variables to hold the Red, Green, Blue colors


Dim Red, Green, Blue As Integer


'Do not panic! As soon as you type this message you will

'get a warning about Unused Local variable 'Red' etc


'Its just saying that we have declared but have not taken


'any use from the variable


'Now we create a random number generator.
'A Random number generator will generate random numbers
'given a specific range


Dim RandomNumGenerator As New Random

'Now we are going to assign each variable a random


'number between 0 and 255. The strategy in this is


'that each color is represented with a value ranging from 0
'to 255 for each Red, Green and Blue values

'Example:- Giving a value between 0 to 255 to each Red, Green and Blue

'we can create colors


'Black is (0,0,0) white is (255,255,255).


Red = RandomNumGenerator.Next(0, 255)
Green = RandomNumGenerator.Next(0, 255)
Blue = RandomNumGenerator.Next(0, 255)


 'Now that we have created 3 numbers lets use them for creating a Red, Green, Blue mixed color


Me.BackColor = Color.FromArgb(Red, Green, Blue)


'We have now setup the back color of the Form
'Me is used to call the form that is currently we are coding for
'BackColor is the property that is used to set or get the Back Color
'Color.FromArgb is a function which will return a color when Red, Green and Blue values are given.


Now that everything is set up! Lets roll!


Private Sub Timer1_Tick(ByVal sender As System.Object,
ByVal e As System.EventArgs) Handles Timer1.Tick
Dim Red, Green, Blue As Integer
Dim
RandomNumGenerator As New Random
Red = RandomNumGenerator.Next(0, 255)
Green = RandomNumGenerator.Next(0, 255)
Blue = RandomNumGenerator.Next(0, 255)
Me.BackColor = Color.FromArgb(Red, Green, Blue)
End Sub

Now this is the code to change the background color… so lets see about the scrolling part…


The scrolling part is pretty easy! All you’ve gotta do is insert the following code for the Timer2’s Tick event


Label1.Location = New Point(Label1.Location.X,
Label1.Location.Y - 1)


Now the Label1 which is somewhere on the form will gradually rise up with each tick of Timer2 because we are steadily keeping the Location X to it self but reducing 1 from the Y coordinate!


The final coding will look like


Public Class Form1

Private Sub Timer1_Tick(ByVal sender As System.Object,
ByVal
e As System.EventArgs) Handles Timer1.Tick
Dim Red, Green, Blue As Integer
Dim
RandomNumGenerator As New Random
Red = RandomNumGenerator.Next(0, 255)
Green = RandomNumGenerator.Next(0, 255)
Blue = RandomNumGenerator.Next(0, 255)
Me.BackColor = Color.FromArgb(Red, Green, Blue)
End Sub

Private Sub
Timer2_Tick(ByVal sender As System.Object,
ByVal
e As System.EventArgs) Handles Timer2.Tick
Label1.Location = New Point(Label1.Location.X,
Label1.Location.Y - 1)
End Sub
End Class


Hope you enjoy!